How to create and configure a mail server on Linux

On Linux, we like to do everything ourselves. That’s why we offer you this guide to create your own mail server on Ubuntu Linux.
| Norton Secure VPN 2023 for up to 5 Devices | |
 | 19,99 $ |
How to configure the DNS server for a mail server on Ubuntu
Connect and update your server
Use SSH to connect to your VPS server. You can use PuTTY to make it easier to get started with SSH.
Then type the command apt-get update
Install Bind
Type the command sudo apt install bind9. Bind is needed to configure a DNS server and Postfix.
Configure /var/cache/db.test
At this point we must take into account that the IP address of our Ubuntu 18.04 machine is 192.168.250.7, it is necessary to replace it with the IP address where we will perform the installation. For this example, we will use mail.test.com as FQDNS.
Now we need to create a new zone for our example. To do this, create a new file with the zone information.
sudo nano /var/cache/bind/db.test
Then add the following:
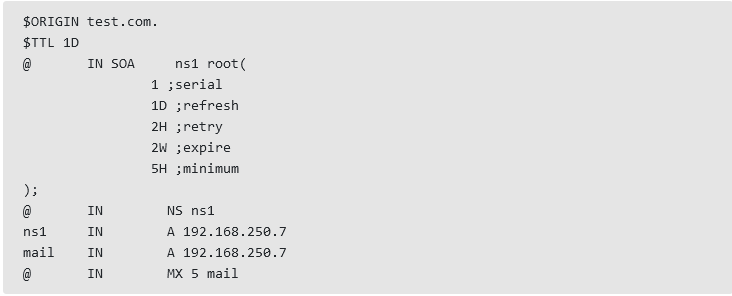
Don’t forget to replace the IP address by the one of your server and change the domain to the one you want to use. Press CTRL+O to save the changes and CTRL+X to close the nano editor.
Add a new zone to the link configuration
Before activating the newly created zone, it is necessary to check the file configuration.
Type: sudo named-checkzone test.com. /var/cache/bind/db.test
Now add the new zone to the configuration file
sudo nano /etc/bind/named.conf.default-zones
zone “test.com.” {
master type;
file “db.test” ;
} ;
Again, CTRL + O to save the changes and CTRL + X to close it.
Configure /etc/bind/named.conf.options
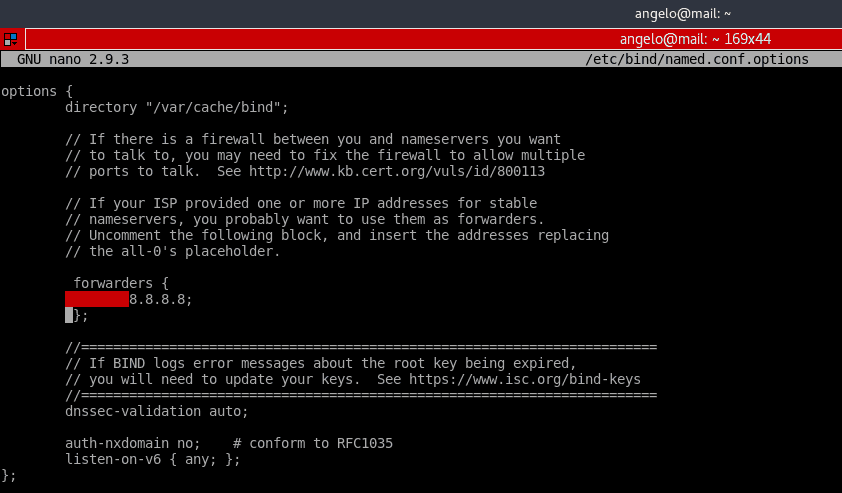
Type the command sudo nano /etc/bind/named.conf.options
Now, in the file /etc/bind/named.conf.options you have to remove the comment bars in the redirectors line and include the Google DNS- 8.8.8.8. Delete the // symbols.
Restart Bind by typing sudo systemctl reload bind9 or
sudo systemctl restart bind9
How to install and configure the mail server on Ubuntu 18.04
Install the Postfix mail server
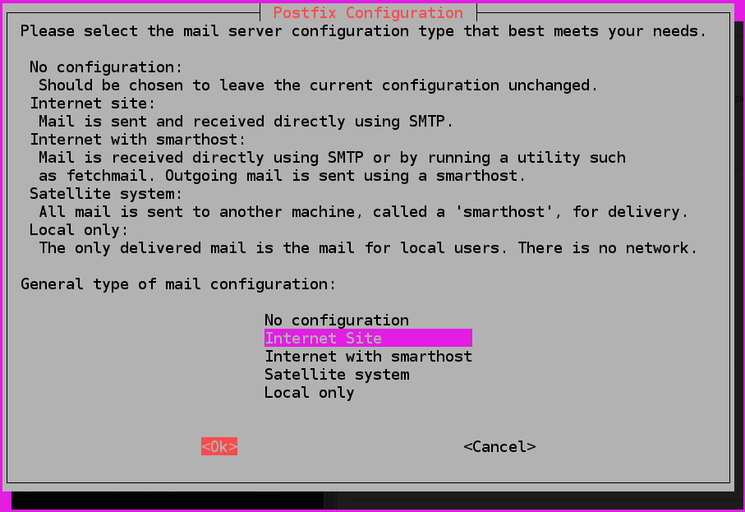
Type the command sudo apt install postfix
Postfix is a mail server coded in C. It is fast, open source and easily accessible.
During the installation, you will need to configure the package. On the first screen, choose the option Internet Site.
Then, for the server name, put test.com.
Add a user
You need users to send emails to each other.
Type the command: sudo usermod -aG mail $(whoami)
create users add them to the mail group so that they can send and receive mail:
sudo useradd -m -G mail -s /bin/bash/ joe
Next, we need to set a password for the newly created user:
sudo passwd joe
Test the Ubuntu mail server
In order to receive an e-mail from the terminal, we will install the mailutils package:
sudo apt install mailutils
Now type the command: mail joe@test.com
This will allow you to send a message to joe, the user you created earlier. After the above command, you will type the subject of the message and its content. Then type CTRL + D to finish.
You can type mail clara@test.com to send a mail to clara. Provided of course that you have created a user with the name of clara.
Read also :
- How to set a complete voice mail system with an asterisk on Ubuntu
- How to create a virtual machine on Ubuntu
Share this content:


Leave a Reply