How to troubleshoot installation failed: Could not create directory.opt/lampp/htdocs/wpcontent/upgrade su Lampp

If you’re a WordPress user, you may have encountered the error “Installation failed: unable to create directory” when trying to install a new plugin or theme, or update an existing one. This can be a frustrating error, but fortunately there are a number of ways of dealing with it. In this article, we’ll explore the causes of this error and provide step-by-step instructions on how to resolve it on Lampp. By following these solutions, you can get your WordPress site back up and running in no time.
What causes installation to fail: directory could not be created?
The “Installation Failed: Could not create directory” error in WordPress can be caused by several factors, including:
- Permission issues: Incorrect permissions on files and folders can prevent WordPress from creating the necessary directories.
- Disk space restrictions: If your server is running out of disk space, there may not be enough space to create new directories.
- Software conflicts: Incompatible software or plugins may interfere with the installation process and prevent directories from being created.
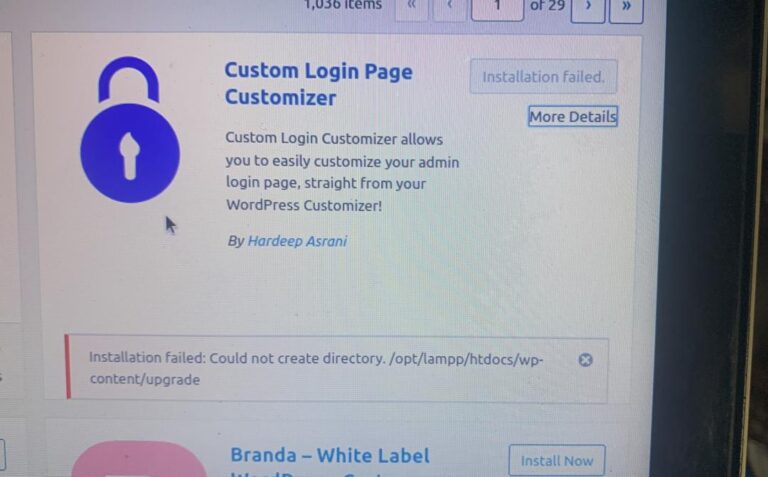
Fix the “installation failed: Could not create directory.opt/lampp/htdocs/wp-content/upgrade” error on Lampp
The “installation failed: Could not create directory.opt/lampp/htdocs/wp-content/upgrade” error on Lampp can be resolved by following the steps below:
- Check the directory permissions: incorrect permissions on files and folders can cause this error. Make sure that the “/opt/lampp/htdocs/wp-content/upgrade” directory has the necessary permissions to be modified. You can do this using the following command in your terminal: sudo chmod -R 755 /opt/lampp/htdocs/wp-content/upgrade.
- Reset permissions: If the permissions are already correct, you can try resetting the permissions of your WordPress files and folders. This can be done by using the command recursively on the WordPress directory. For example, you can run chmodsudo chmod -R 755 /opt/lampp/htdocs/wp-content to set the appropriate permissions.
- Check the owners of the directory: Make sure that the “/opt/lampp/htdocs/wp-content/upgrade” directory has the correct owner. To do this, use the following command: sudo chown -R your_username:your_username /opt/lampp/htdocs/wp-content/upgrade. Replace “your_username” with your user name.
- Remove any incompatible software or plug-ins that may be causing the problem.
- Restart Lampp: After making the necessary changes, restart Lampp using the following command: sudo /opt/lampp/lampp restart.
- Try the installation again: After following these steps, try reinstalling your WordPress application or plugin. Be sure to follow the installation instructions carefully.
- Contact support: If none of the above solutions work, you may need to contact the Lapp support team or your hosting provider. They can help you solve the problem and provide specific advice depending on your server configuration.
By following these steps, you should be able to resolve the “installation failed: Could not create directory.opt/lampp/htdocs/wp-content/upgrade” error on Lampp. Also make sure that you have correctly configured your Lampp environment and that you have the necessary authorisations to carry out the modifications.
See also:
Share this content:


Leave a Reply