During the installation of Windows, you may encounter an error indicating that the selected disk is not compatible with the computer’s hardware for booting. This message may appear if the disk uses a partition format not supported by your system’s BIOS or UEFI mode, or if security settings are blocking the installation.
To resolve this problem, here are the different available solutions:
- Convert the disk partition format
- Modify BIOS/UEFI settings
- Disable Secure Boot
Solution 1: Convert the Disk Partition Format
Adjust the disk partition format (GPT or MBR) to make it compatible with the boot mode used by your system (UEFI or Legacy BIOS).
Steps:
- Step 1: Open Command Prompt
Press Shift + F10 during the Windows installation to open Command Prompt.
- Step 2: Launch Diskpart
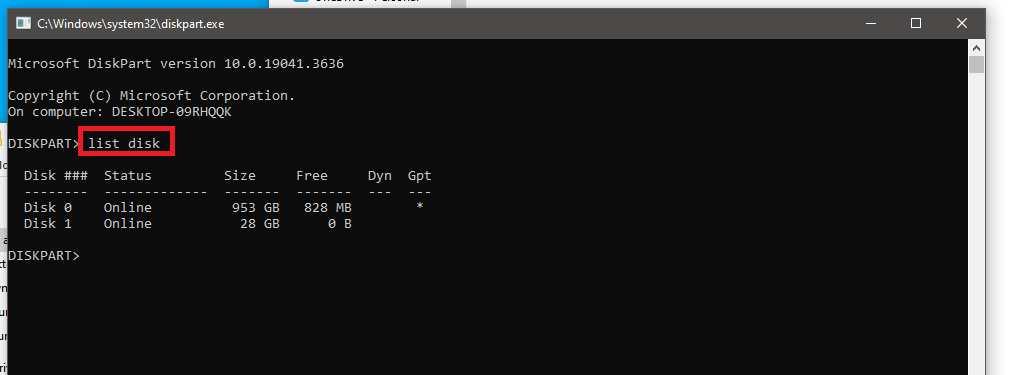
Type diskpart and press Enter to access the disk management tool.

- Step 3: List Available Disks
Type list disk to see the disks available on your computer.

- Step 4: Select the Relevant Disk
Select the disk in question by typing select disk X (replace X with the disk number).

- Step 5: Convert the Partition Format
To convert to GPT, type convert gpt and press Enter. To convert to MBR, type convert mbr.

- Step 6: Restart Installation
Close Command Prompt and restart the Windows installation.
Solution 2: Modify BIOS/UEFI Settings
Configure your system’s boot mode (UEFI or Legacy BIOS) to match the disk partition format.
Steps:
- Step 1: Access BIOS/UEFI
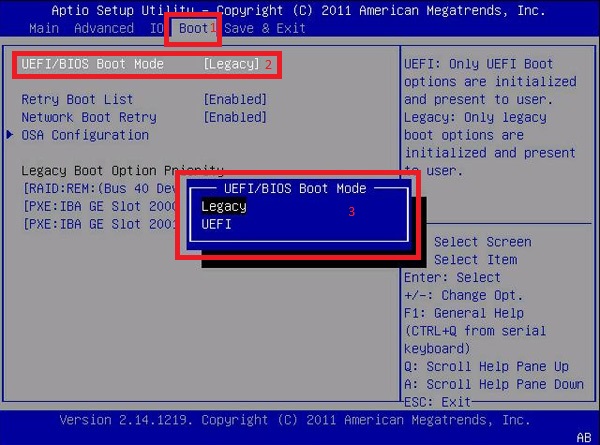
Restart your computer and access BIOS/UEFI by pressing F2, Esc, or another key specific to your system.
- Step 2: Configure Boot Mode
Look for the Boot Mode or UEFI/BIOS Boot Mode option and set it to UEFI if your disk is GPT, or to Legacy if your disk is MBR.

- Step 3: Set Boot Priority
Make sure the relevant disk is at the top of the boot priority list.
- Step 4: Save and Restart
Save the changes and restart to relaunch the Windows installation.
Solution 3: Disable Secure Boot
Disable the Secure Boot feature that may block the installation of certain unsigned operating systems.
Steps:
- Step 1: Access BIOS/UEFI
Restart your computer and access BIOS/UEFI as described previously.
- Step 2: Locate Secure Boot
In the security or boot settings, locate the Secure Boot option.

- Step 3: Disable Secure Boot
Disable Secure Boot and save the changes.
- Step 4: Restart Installation
Restart your computer and relaunch the Windows installation.
Windows ne peut pas être installe sur ce disque
Windows could not start the Windows Update service on the local computer

Driven by a passion for technology, I strive to simplify the complexities of the digital world. I provide clear, practical advice and up-to-date insights to help you navigate and utilize technology effectively.
My goal is to offer solutions to your information technology (IT) and digital challenges while sharing tips that make your daily tech interactions smoother. Whether you’re new to the tech scene or an experienced user, my articles are designed to guide, inspire, and address the issues you may encounter.
Explore the dynamic world of technology with me and stay informed about the latest innovations through my content.
