How to create your own cloud server: the complete guide

There are some very good Cloud options out there, but if you wish to create your own Cloud server, follow the instructions below carefully.
There are a lot of software that allow you to create your own cloud server. The best ones are : NextCloud, ownCloud Seafile Pyric and Resilio.
In this guide we will use Netxcloud to create a local cloud server. Then we’ll take things a step further and show you how to create a remote cloud server so you can access it from anywhere in the world.
| Norton Secure VPN 2023 for up to 5 Devices | |
 | 19,99 $ |
What is Nextcloud meant for ?
Nextcloud is a storage server for the cloud. It is available on virtually all platforms: Windows, macOS, Linux, Android and iOS. In other words, the cloud server you create with Nextcloud will be accessible on all your devices.
If you prefer browsers, you can log into your Nextcloud web portal to access your data.
Some additional features such as video conferencing, instant messaging and the ability to add users.
How to create a local Nextcloud server
A local cloud server will be limited to devices connected to your network. You will not be able to access it from anywhere in the world. These servers are mainly used for testing.
For this operation, you will need to install a virtual machine (VM). Unless you wish to dedicate a computer to create your local Cloud server.
To create this VM, your computer must have the following minimum resources:
- A 64-bit processor with a 64-bit OS.
- An Internet connection.
- 10 GB of free disk space.
- At least 1 GB of RAM fully dedicated to the VM.
Step 1: Create a Virtual Machine
We will use VirtualBox from Oracle to create our VM. It’s a powerful and free software for personal use.
Go to the official VirtualBox website and download the version that corresponds to your system. Once the download is finished, install and launch VirtualBox.
In VirtualBox, click on New to create a new virtual machine.
Give the virtual machine a name containing the word “Ubuntu”. Make sure the Type is Linux and the version is 64-bit Ubuntu. Click Next.
Set the “Memory Size” to 1024 MB (1 GB) and click Next.
Under “Hard disk”, choose the option “Create a virtual hard disk” and click on Create.
For “Hard disk file type”, choose VDI and click Next.
For “Physical hard disk storage”, choose Dynamic allocation.
For “Location and file size”, set it to at least 10 GB and click Create.
Click on Settings, then Network. Under “Attachment A”, choose Bridged Adapter and click OK.
That’s all you need to do to set up the virtual machine for now.
Step 2: Download an Ubuntu server
To create a cloud server with NextCloud, you will need a Linux server. We will work with Ubuntu.
Go to the official Ubuntu website and download the ISO. Make sure you have downloaded the 64bit version.
Step 3: Install Ubuntu in the virtual machine
Start your virtual machine by clicking on the VirtualBox Start button.
In “Select Boot Disk”, click on the folder icon and navigate to the Ubuntu ISO downloaded in step 2.
Once Ubuntu has finished booting, your virtual machine will be ready.
When the VM window has focus, it will support the mouse and keyboard, just like any other software would; but it does so more aggressively. To fix this, press the Control key (Ctrl) on the right of your keyboard.
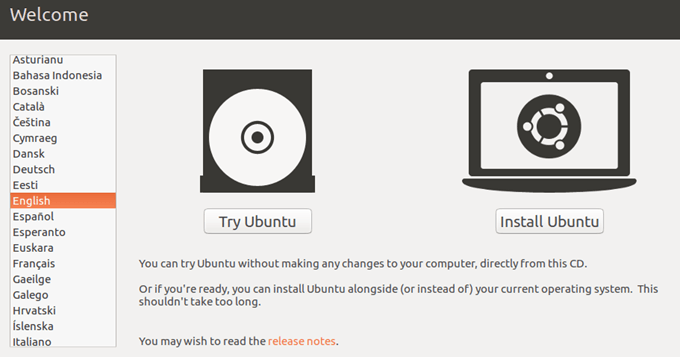
After making some changes, select “Install Ubuntu” and press Enter.
Under “Network Connections”, select the network card that Ubuntu should use. Select Ethernet (eth) then Done and press enter.
At “Set up proxy”, press Enter.
At “Configure Ubuntu archive mirror”, press Enter.
Then choose the default value for “File system configuration”. This will be “Use a whole disk”. Press Enter.
Now choose VirtualBox VDI as the disk to install on.
Read the information displayed, then select Done and press Enter.
Select Continue and press Enter.
Under “Profile Setup”, create a new user profile. This profile will be the default administrator account
Under “SSH Configuration”, check the box labelled Install OpenSSH server.
Choose Done and press Enter.
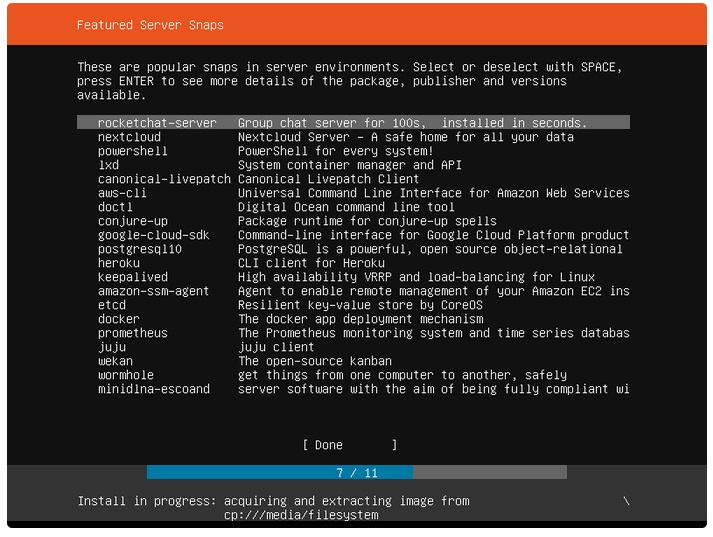
Under “Featured Server Snaps”, choose Nextcloud. Choose Done and press Enter.
When prompted, choose to Reboot.
Step 4: Configure Ubuntu and install the Nextcloud server
When the Ubuntu server starts in your VM, enter the password and username of your Ubuntu profile.
Type the commands sudo apt-get update && sudo apt-get upgrade && sudo apt-get dist-upgrade to update the server. If necessary, enter your password again.
Type sudo ufw allow OpenSSH to allow SSH connections at the firewall.
Type sudo ufw enable to activate the firewall.
Type sudo ufw status to verify that the firewall is filtering the server’s network traffic.
Type sudo ufw allow OpenSSH, then sudo ufw enable.
Type sudo nextcloud.manual-install user pass
Instead of the words “user” and “pass” put your username and password respectively.
Type the command sudo ufw allow 80 443/tcp to open the http and HTTPS ports.
Type sudo ufw allow 80 443/tcp.
Type sudo nextcloud.occ config:system:gettrusted_domains to get the list of Nextcloud trusted domains.
Type “un | grep inet” without quotes to determine the IP address of your server.
Type sudo nextcloud.occ config:system:set trusted_domains 1 –value=domain replacing “domain” with the IP address found in the previous step.
Type sudo nextcloud.enable-https self-signed to allow Nextcloud to encrypt your data. On a home network like the one we are working with, self-signed certificate will be sufficient.
That’s it for the NextCloud server configuration. You now have your own cloud server. Now you need to find a way to connect to it.
Step 5: Connect to your Nextcloud server
To access the Nextcloud web dashboard, you need to add a security exception to your browser so that it accepts your self-signed SSL certificate.
Open your browser and go to the address of your Nextcloud server that you entered during setup. The browser will report that the SSL certificate is self-signed. Choose to continue the connection.
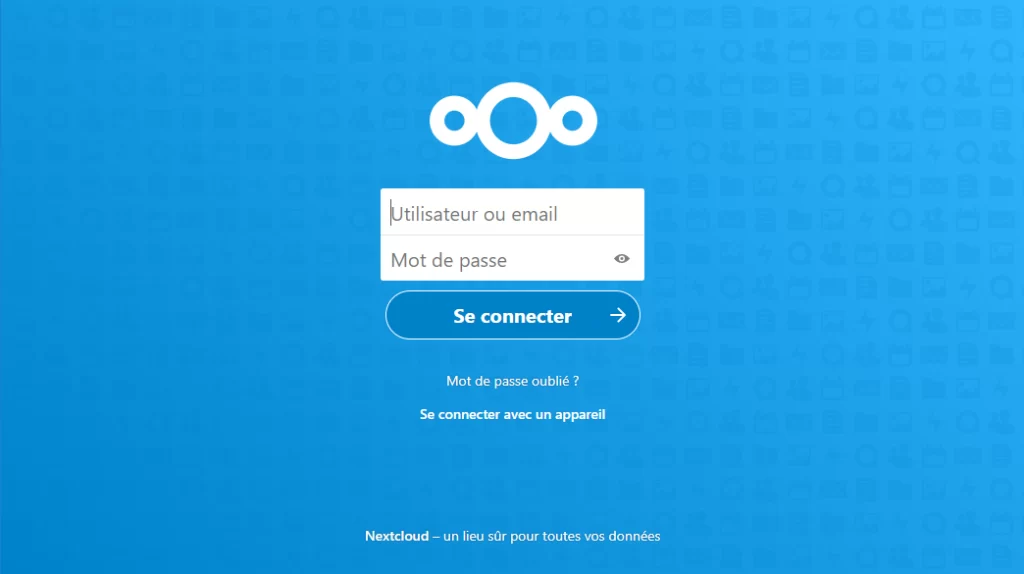
Once the Nextcloud interface appears, enter your password and username. The ones you put in during the Nextcloud server setup step. Then click on Connect.
You will then see the Nextcloud dashboard. There are many options on how to manage your cloud data. Look online for a detailed guide to Nextcloud.
Step 6: Install a Nextcloud client on your computer
Open a browser and go to https://nextcloud.com/install/. Click Download for Desktop. Download the version that matches your operating system.
Once the download is complete, install the software leaving all settings at their default values.
When the installation is complete, check the Run Nextcloud” box and click Finish.
On the Nextcloud login page, click Connect. Enter the IP address of your server.
You will be warned again that the certificate is self-signed. Check the box labeled Trust this certificate anyway. Click on OK.
Click Connect.
Enter your Nextcloud name and password and click Login.
Click Grant Access.
In “Configure local folder options”, click Connect.
In the local folder options section, leave the default values, then click Connect.
Nextcloud will start its first sync and download the default files to your local folder. When finished, a white “just” sign in a green circle will appear. During syncs, this green will turn blue.
The notification area of your taskbar now contains an icon that allows you to configure your Nextcloud server.
You have now created, configured and synchronized a Nextcloud server. At any time, you can open an explorer window, and press Windows + E to see the contents of your local Nextcloud folder.
Go to the Appstore or Playstore and install the Nextcloud application. You will be able to use it to access the Cloud server created above with your Ubuntu VM and Nextcloud.
You will just need to enter your server address, your Nextcloud name and password, accept the self-signed certificate and you will be able to sync your files on your brand new Cloud.
If at any time you wish to shut down the Ubuntu server, type the command sudo shutdown now
Of course you can always restart it later by opening a VirtualBox window. You will click on your Ubuntu server then on Start.
Create a Nextcloud Server Accessible on the Internet
The Cloud created above is fine, but once you move away from your building, you can no longer access it. To create a cloud that can be accessed anywhere on Earth, follow the steps below.
Step 1: Buy a domain name
You need a domain name to set up a remote cloud. We recommend Teugnology, a reliable web hosting and domain name provider with excellent customer support.
If you already have a domain name, you can configure Nextcloud to use a subdomain of your domain. Example: mycloud.com
The most important selection factor is that your host must be on Ubuntu.
Type apt -get update && apt-get upgrade && apt-get dist-upgrade
This will update your Ubuntu version.
Choose to keep the GRUB configuration if asked.
Type adduser username replacing “username” with a new user name. Then enter your password and confirm it. You can leave out the other configuration items.
Type usermod -aG sudo username replacing username with your chosen username above. With this command, you will be able to access the administrator’s commands without necessarily accessing the root account.
Type the exit command to log out of the root account.
Now log in with the username and password created above.
Type if ! which snap; then sudo apt-get install snapd; fi to check if the snap package manager is installed. If it is not, install it.
Step 2: Install NextCloud on the subdomain
Type sudo snap install nextcloud to install the NextCloud server.
Type sudo nextcloud.manual-install newuser newpass. Instead of newuser and newpass, you enter the username and password respectively that you will use to connect to your Cloud server.
Then type sudo ufw enable 80 443/tcp to allow OpenSSH, HTTP and HTTPS connections.
Type sudo ufw enable to activate the firewall.
Type sudo nextcloud.occ config:system:set trusted_domains 1 –value subdomain.mydomain.com replacing subdomain.mydomain.com with your subdomain name. This will set it as a trusted domain.
Type sudo nextcloud.enable-https lets-encrypt to create an SSL certificate.
When asked to enter an email address, enter it.
In the “Enter your domain name(s)” section, your subdomain name.
Your Nextcloud Server is now available on the internet. You can access it from anywhere.
Step 3: Access your NextCloud server
Open a browser and enter the subdomain name entered above. You will then see a Nextcloud web portal that asks for a username and password.
You can also download the Nextcloud client app for computer, Android and iOS to access your Cloud server. When setting up the application, use your subdomain as the server address. Of course your username and password are the ones you filled in when setting up your Nextcloud server.
This is the process of creating a personal Cloud server accessible anywhere in the world.
Also Find out :
Share this content:


Leave a Reply